Trim the Confusion - Installing Metal Roof Eave Trim Made Easy

Thomas Valera // Owner of NOVA ROOFTEK
Why Proper Eave Trim Installation is Critical for Metal Roof Performance
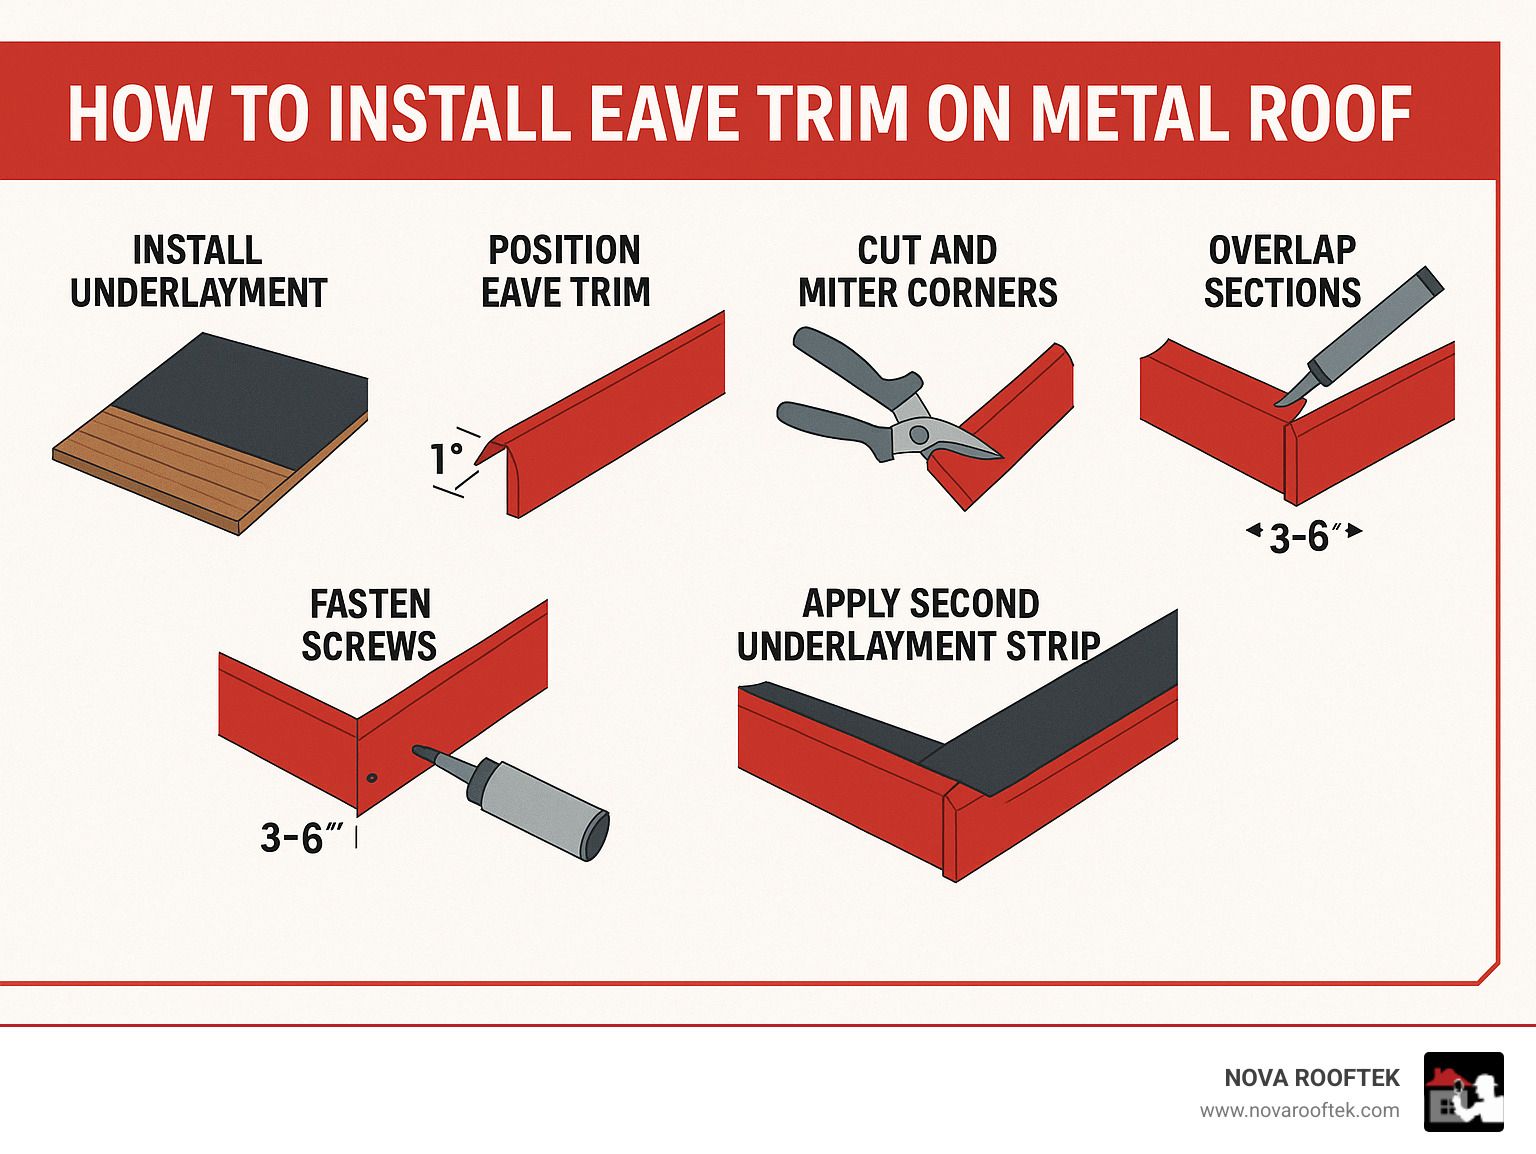
Learning how to install eave trim on metal roof systems is essential for preventing water damage and protecting your home's fascia boards. Here's the basic installation process:
Quick Installation Steps:
- Install underlayment first on bare roof deck
- Position eave trim with 1" overhang at corners
- Cut and miter corners using aviation snips
- Overlap sections by 3-6 inches with sealant
- Fasten with pancake-head screws 12" on center
- Apply second underlayment strip over trim edge
Eave trim—also called drip edge—is the first piece of metal roofing trim installed along the low edge of your roof. It directs water away from fascia boards and prevents leaks that can cost thousands in repairs. Without proper eave trim, even the best metal roof can fail where it meets your home's walls.
The installation process varies slightly between standing seam and exposed fastener systems, but the fundamentals remain the same. Standing seam roofs typically require 6-inch minimum overlaps and special clips, while exposed fastener systems use direct screwing through the trim face.
As Thomas Valera, owner of NOVA ROOFTEK with over a decade of roofing experience in Northern Virginia, I've seen countless metal roof failures that started with improper eave trim installation—which is why mastering how to install eave trim on metal roof systems correctly is so important. My team has perfected these techniques through hundreds of metal roofing installations across McLean and Alexandria.
Eave Trim 101: Purpose, Types & Costs
Think of eave trim as your metal roof's first line of defense against water damage. This humble piece of flashing does three important jobs that can save you thousands in repairs down the road.
First, it creates a watertight barrier where your roof meets the fascia board. Without this protection, water seeps behind your roofing panels and rots the wood underneath—trust me, I've seen fascia boards that looked like Swiss cheese after just a few years without proper eave trim.
Second, it directs water where it belongs—into your gutters or safely away from your foundation. Water running down your walls is never a good thing, and eave trim prevents this messy (and expensive) problem.
Third, it provides wind uplift resistance. Here in Northern Virginia, we get some serious storms, and the edges of your roof take the biggest beating from wind forces. Proper eave trim helps keep your entire roofing system locked down tight.
When you're learning how to install eave trim on metal roof systems, you'll encounter three main types. Mini eave trim measures 2.5" x 2.5" and works perfectly for most residential applications with standard fascia boards. Full-size eave trim at 5.25" x 5.25" provides maximum coverage for larger fascia or commercial buildings. Bullnose drip edge offers the easiest installation process with fewer parts to juggle.
Standing seam and corrugated metal roofs use similar eave trim profiles, though standing seam systems often require special clips for proper attachment. The key difference lies in how the trim integrates with the panel system itself.
Based on our experience installing hundreds of metal roofs across McLean and Alexandria, expect to pay $1.25 to $2.50 per linear foot for quality eave trim. A basic 26-gauge mini eave in galvalume finish sits at the lower end, while premium full-size trim in PVDF finish commands top dollar. Most suppliers stock 10 to 12-foot lengths, so plan your overlaps accordingly.
| Trim Type | Size | Best Use | Cost Range |
|---|---|---|---|
| Mini Eave | 2.5" x 2.5" | Residential, small fascia | $1.25-$1.75/ft |
| Full-Size | 5.25" x 5.25" | Commercial, large fascia | $1.75-$2.25/ft |
| Bullnose | Variable | Easy install, low pitch | $2.00-$2.50/ft |
Does Every Metal Roof Need Eave Trim?
Absolutely, yes. Every metal roof needs eave trim or drip edge—no exceptions. Virginia building codes require drip edge along all eaves and rakes specifically to protect your home's structural elements from water damage.
Even if your local inspector might miss it, skipping eave trim is like playing Russian roulette with your biggest investment. I've seen too many callbacks where homeowners tried to save a few hundred dollars on trim, only to face thousands in fascia and soffit replacement within just a few years.
The math is simple: spend a little now on proper eave trim, or spend a lot later on roof repair and structural damage. Your future self will thank you for doing it right the first time.
Choosing the Right Profile for Northern VA Homes
Our Northern Virginia climate throws some curveballs at metal roofing systems. We deal with everything from ice storms to summer deluges, plus those crazy temperature swings that make metal expand and contract like an accordion.
For homes in McLean, Alexandria, and surrounding areas, I typically recommend full-size eave trim. The larger profile handles our freeze-thaw cycles better and provides superior protection against ice dam formation. When ice builds up along your roof edge, you want all the coverage you can get.
Climate factors matter more than you might think. Our region's snow loads and rapid temperature changes put extra stress on roof edges, making quality eave trim selection crucial for long-term performance.
From a curb appeal standpoint, full-size eave trim also creates cleaner lines and better proportions on most homes. It's one of those details that separates a professional installation from a DIY job that looks "almost right."
If you're considering a complete metal roofing upgrade, investing in proper eave trim pays dividends in both performance and home value. Standing seam systems work particularly well in our climate, and when paired with quality eave trim, they'll protect your home for decades.
Gathering Tools & Preparing the Roof Edge
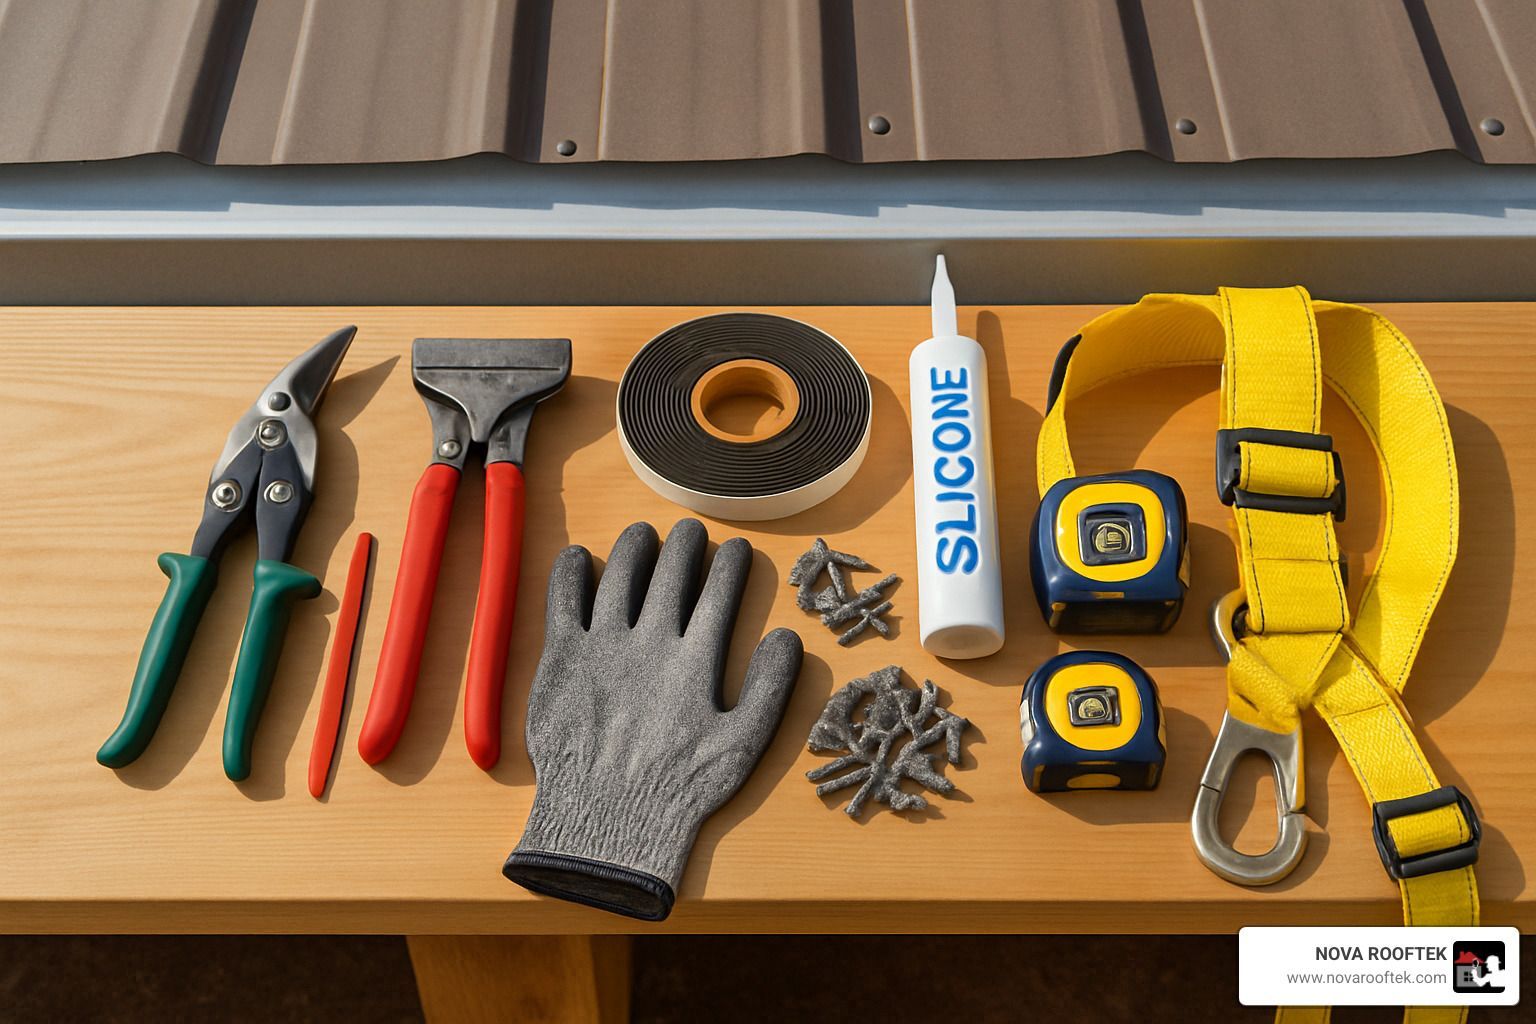
Getting your tools and workspace ready before you start learning how to install eave trim on metal roof systems will save you countless trips up and down the ladder. Nothing's more frustrating than realizing you forgot your snips when you're already positioned on the roof edge.
Your essential cutting tools include aviation snips in all three types—left-cut, right-cut, and straight-cut. Each serves a specific purpose when shaping trim pieces around corners and curves. You'll also need a hand seamer for creating clean bends and tabs, plus a carpenter's pencil for marking cut lines clearly.
Safety gear isn't optional when working roof edges. Cut-resistant gloves protect your hands from sharp metal edges that can slice through regular work gloves like butter. A safety harness rated for roofing work keeps you secure, and non-slip shoes provide better traction on metal surfaces.
For fastening, stick with 1-inch pancake-head screws designed for metal-to-wood applications. These low-profile screws prevent dimpling when roof panels sit on top, and they're much easier to remove than nails if adjustments are needed. You'll also want butyl tape for sealing, silicone sealant for joints, and a quality measuring tape that won't stretch or break in cold weather.
Measuring, Layout & Cutting Tricks
Smart measuring starts with understanding the 1-inch corner overhang rule—each trim piece should extend one inch past corners for proper mitering. When calculating your material needs, add 3 to 6 inches per joint for overlaps, with standing seam systems requiring the full 6-inch minimum for wind resistance.
Here's a trick that separates pros from weekend warriors: use the reverse-snip technique when cutting trim pieces. Start from the finished edge and work backward toward your waste material. This prevents the cut edge from curling and gives you those clean, professional-looking lines that make all the difference.
For a typical Northern Virginia home with a 40-foot eave, you'd need five 10-foot trim pieces with four overlaps. That calculation looks like 40 feet plus four 6-inch overlaps, totaling 42 feet of actual trim needed—always order 10% extra for waste and those inevitable measuring mistakes.
Underlayment Sequencing Explained
The relationship between eave trim and underlayment trips up many DIYers, but the sequence is actually straightforward once you understand the "sandwich method" we use on every roof installation in McLean and Alexandria.
Start by installing your synthetic felt underlayment first, extending it all the way to the roof edge. This base layer provides your primary weather protection. Next, position your eave trim directly on top of this underlayment—this is where many people get confused about what goes over or under.
Finally, apply an 8-inch strip of ice-and-water barrier over the top edge of your installed eave trim. This creates that sandwich effect: underlayment on bottom, trim in the middle, and waterproof membrane on top. This double-protection system has prevented countless water damage claims in our Northern Virginia climate, where freeze-thaw cycles and ice dams can challenge even the best roofing systems.
How to Install Eave Trim on Metal Roof
Now comes the exciting part—actually learning how to install eave trim on metal roof systems the right way. Think of this as building a foundation for your entire roofing system. Get this step wrong, and everything else suffers. Get it right, and you'll have bulletproof protection for decades.
Start at the left corner of your eave and work methodically toward the gable end. There's a reason professionals always work left to right—it creates natural overlap patterns that shed water effectively. Before you position anything, peel off that protective film from your first trim piece. Trust me, trying to remove plastic film after you've screwed the trim down is like trying to unwrap a present while wearing oven mitts.
Position your first piece with that crucial 1" overhang at the corner. The unhemmed edge needs to sit snugly against your fascia board—no gaps, no buckling. This is where many DIY installations go sideways, so take your time getting this foundation piece perfect.
Installation Sequence & Underlayment Integration
Here's the golden rule that separates successful installations from expensive do-overs: underlayment first, eave trim second, roofing panels third, ridge cap last. This sequence isn't arbitrary—it's based on how water actually moves across your roof.
Your eave trim creates a sandwich effect with the underlayment. The primary synthetic underlayment goes down first, extending all the way to the roof edge. Then your eave trim sits on top of this base layer. Finally, that 8" strip of ice-and-water barrier goes over the eave trim's top edge.
This layering system creates multiple backup barriers against water infiltration. Each layer sheds water to the one below it, and nothing ever flows uphill. In Northern Virginia's challenging climate, this redundancy prevents the ice dam problems that plague many homes during our unpredictable winters.
Corner & Gable End Detailing for a Clean, Watertight Finish
Corner work is where you'll either look like a pro or clearly reveal your amateur status. The secret is in the preparation—measure twice, cut once, and take your time with the bending.
Mark your 45-degree miter cut carefully, accounting for the metal's bend radius. Here's the key: cut only up to the bend line, then remove the hem section that would interfere with your corner fold. Use your hand seamer to create crisp, tight bends around the corner. The goal is a seamless transition that water can't penetrate.
For gable ends, extend your eave trim about 1" past the gable board edge. This extension will tuck under your rake trim later, creating that professional overlap sequence that keeps water moving in the right direction. Check out this video guide on bullnose corners for visual reference on the trickiest corner details.
Overlapping & Fastening Best Practices
Overlapping adjacent trim pieces requires precision and patience. For exposed fastener systems, 3-6 inches of overlap works well, but standing seam systems demand the full 6" minimum. Before joining pieces, run a bead of silicone sealant between them—this prevents wind-driven rain from sneaking through the joint.
Fastener placement makes or breaks your installation. Position pancake-head screws 8" from each end of every trim piece, then space additional screws 12" on center along the length. The pancake head design prevents dimpling when your roofing panels sit on top later.
Don't overdrive those screws—they should sit flush without creating dimples in the metal. If you ever need roofing repair services down the road, properly installed fasteners make the work much easier and less expensive.
For a cleaner look with better wind resistance, consider hidden-cleat systems. Continuous cleats attach to your fascia board, and the trim clips onto these cleats. No exposed fasteners means better aesthetics and superior weather performance.
Standing Seam vs. Exposed Fastener Nuances
Standing seam systems require extra attention to thermal movement and clip placement. Metal expands and contracts significantly with temperature changes, and your eave trim must accommodate this movement without binding or creating stress points.
Use only the manufacturer's specified clips and cleats, and maintain that 6" minimum overlap religiously. The trim must allow panels to move freely while maintaining weathertight seals. It's more complex than exposed fastener systems, but the superior performance justifies the extra effort.
Exposed fastener systems offer simpler installation—you can fasten directly through the trim face into your roof deck or fascia. This approach works perfectly for residential applications and costs less than hidden-fastener alternatives.
Bullnose drip edge simplifies standing seam installations dramatically, requiring fewer parts and less complex detailing. However, avoid bullnose trim on roof pitches steeper than 6:12—the profile doesn't shed water effectively on steep slopes, which can lead to problems during heavy rains.
At NOVA ROOFTEK, we've perfected these techniques through hundreds of metal roofing installations across McLean and Alexandria. The difference between amateur and professional installation often comes down to these seemingly small details that prevent major problems later.
Common Mistakes, Maintenance & Material Take-Offs

After installing hundreds of metal roofs across Northern Virginia, I've seen homeowners make the same costly mistakes over and over again. The most common error? Misaligned overlaps that create perfect entry points for water. What looks like a minor gap can channel thousands of gallons into your home during heavy storms.
Wrong screw types cause problems too. Regular drywall screws rust out within months, while oversized screws create unsightly dimples that collect water. Skipping sealant at joints might save you five minutes during installation, but it guarantees you'll be dealing with leaks later.
Fastener spacing issues plague many DIY installations. Under-fastening allows wind uplift that can peel entire sections off during storms—we've responded to emergency calls where improperly fastened trim turned into projectiles. Over-fastening distorts the metal and creates stress points that crack over time.
The solution is simple: follow manufacturer specifications exactly. These aren't suggestions—they're engineered requirements based on wind load testing and real-world performance data. When we handle roof repair work, improper eave trim installation is often the root cause of larger problems.
Estimating Cost & Quantity Like a Pro
Getting your material estimate right prevents frustrating trips to the supply house mid-project. Calculate total linear footage by measuring every eave that needs trim, then add your overlap allowances. Standing seam systems need 6 inches per joint while exposed fastener systems can work with 3-4 inches.
Include a 10% waste factor for cuts, mistakes, and future repairs. For a typical 2,000 square foot home in McLean, expect to invest $200-400 in eave trim materials depending on your chosen profile and finish.
Professional installation typically runs $3-5 per linear foot including materials. While this might seem steep, proper installation prevents water damage that can cost thousands. We've seen DIY how to install eave trim on metal roof projects that cost more to fix than professional installation would have cost initially.
Local pricing in McLean and Alexandria reflects our area's higher material costs and skilled labor market. However, the investment pays dividends in performance and longevity—especially important given our region's challenging weather patterns.
Post-Install Care & Inspection Schedule
Your eave trim installation isn't maintenance-free, but it doesn't need much attention either. Inspect twice yearly—spring and fall work perfectly with gutter cleaning and other seasonal tasks. Look for loose fasteners, damaged sealant joints, or signs of water infiltration around the trim edges.
Clean debris from the trim channel regularly. Leaves, pine needles, and other organic matter can dam up water flow and cause backups behind your trim system. This is especially important in Northern Virginia's heavily wooded neighborhoods.
Reseal joints every 5-7 years or when you notice the sealant becoming hard or cracking. Quality silicone sealants last longer than cheap alternatives—don't cut corners on materials that protect your home's structure.
Keep your gutters properly aligned with the eave trim. Overflowing gutters can overwhelm even perfectly installed trim systems, causing water to back up behind the metal and find its way into your home. If you're experiencing gutter issues, our siding and gutter replacement services can address both problems together.
Regular maintenance catches small problems before they become expensive disasters. When you spot issues early, they're usually simple fixes rather than major roof replacement projects.
Frequently Asked Questions about Installing Eave Trim
These are the most common questions I hear from homeowners tackling their first how to install eave trim on metal roof project. After helping hundreds of families in McLean and Alexandria with their metal roofing needs, I've noticed the same concerns come up repeatedly.
What fastener spacing prevents wind uplift?
Proper fastener spacing is crucial for wind resistance, especially here in Northern Virginia where we get those sudden summer storms. Place your first screws 8 inches from each end of every trim piece—this prevents the ends from lifting during high winds.
For the middle section, space screws 12 inches on center along the entire length. This might seem like overkill, but I've seen what happens when homeowners try to save money by using fewer fasteners. Those loose sections become projectiles during storms, and the repair costs far exceed the savings from a few screws.
Use pancake-head screws that penetrate at least 3/4 inch into solid wood. The low profile prevents interference with roofing panels, and the extra penetration gives you the holding power needed for our area's wind loads.
Does eave trim go over or under synthetic underlayment?
This question confuses almost everyone, and honestly, the answer is both over and under! Think of it as creating a waterproof sandwich that protects your home from multiple angles.
Start by installing your primary synthetic underlayment first, extending it all the way to the roof edge. Next, install the eave trim directly on top of this underlayment layer. Finally, apply an 8-inch strip of self-adhered ice-and-water barrier over the eave trim.
This sandwich method creates double protection against wind-driven rain and ice dam backup—both serious concerns for Northern Virginia homes. We use this technique on every roof installation because our climate demands this level of protection.
Can I retrofit drip edge without removing panels?
Sometimes yes, but it's rarely the best approach. On exposed fastener systems, you might squeeze trim under panel edges if there's enough clearance. However, this compromise installation often creates gaps and reduces the effectiveness of your weather protection.
Standing seam systems almost always require complete panel removal for proper trim installation. The clips and seams don't leave enough room to slide trim underneath, and forcing it can damage both the panels and the trim.
If you're considering retrofitting drip edge on an existing metal roof, reach out to the NOVA ROOFTEK team to schedule a free inspection and estimate. We can assess whether your specific roof allows for proper retrofit installation or if panel removal is necessary for a watertight result. Our same-day response guarantee means you get answers fast, without the guesswork.
Conclusion & Next Steps
Learning how to install eave trim on metal roof systems is one of those skills that pays dividends for years to come. When done right, proper eave trim installation protects your home from water damage, preserves your fascia boards, and keeps your metal roof performing at its best for decades.
The techniques we've covered—from proper underlayment sequencing to corner detailing—might seem detailed, but they're the difference between a roof that lasts 50 years and one that needs expensive repairs in just a few seasons. Every overlap, every fastener, and every bead of sealant matters when it comes to keeping water where it belongs.
At NOVA ROOFTEK, we've refined these installation methods through hundreds of metal roofing projects across McLean, Alexandria, and the rest of Northern Virginia. Our team understands exactly how our region's weather patterns—from summer thunderstorms to winter ice dams—affect metal roof performance. That's why homeowners throughout the area trust us with their most important investment.
Whether you tackle this project yourself or hire professionals, don't cut corners on eave trim. The modest cost of quality materials and careful installation prevents thousands in water damage repairs down the road. We've seen too many "bargain" installations that ended up costing homeowners far more than doing it right the first time.
If you're considering professional installation, our same-day service and price-match guarantee make quality work accessible and affordable. With over 450 five-star reviews, we've built our reputation on getting roof installation projects done right the first time—no callbacks, no surprises, no headaches.
Ready to protect your investment? Request your free estimate and comprehensive roof inspection online today. A certified NOVA ROOFTEK technician will evaluate your current roof condition and provide detailed recommendations custom to Northern Virginia's unique climate challenges.
Contact us now to learn how our team can safeguard your home—whether you need a complete roof replacement or simply want to upgrade your current eave trim system. We look forward to serving you with the same commitment to quality and community that has made us Northern Virginia's go-to roofing contractor.
Ready to experience excellence in roofing?
Please feel free to contact with us. We will aim to get back to you with 1-2 business days at the latest. Alternatively, feel free to call us now.
Phone: (703) 407-2714
Monday - Saturday 9AM – 6PM
Sunday Closed
Schedule a Free Roof Inspection
Contact Us
SHARING IS CARING